
Getting Started
Hello and thankyou for purchasing a Variant enabled template by Medium Rare. This documentation will give you an understanding of how Variant works and guide you in performing common functions. If you require further assistance not covered in this documentation, please contact us on our support forum via the button in the top right-hand corner.
1. Quick Start - An overview of how Variant works
Open Variant
Open the builder.html file in your web browser and click the 'Start New Page' button located in the center of the page.
Add Content
You will notice that the available sections panel has opened. Add some sections to your page by clicking on the section thumbnail. You will see that once a section is added to the page, it also gets added to your layout map in the sidebar. Try adding some different content sections and reordering them by dragging their titles up and down in the layout map on the sidebar.
Add a navigation by clicking the 'Navigation Styles' button in the sidebar, select your desired style from the list to add it to your page.
Get Output
Once you have added sections to your page and edited content. Click the 'Get HTML' button at the bottom of the 'Content' or 'Styles' tab, this will show a modal with your page's HTML. From here, you can download your page directly to a .html file or copy and paste this HTML into a file eg. 'my-page.html' and place it in the root template directory (not the variant directory).
Open this file in your browser to view.
2. Managing Sections
2.1 Adding Sections:
To add a section, click the circular plus button on the 'Content' tab in the sidebar. This will open the 'Add Sections' panel. From here, add sections to your page by clicking on their thumbnail (see figure 2.1.1). You will notice that section types are categorised and are filterable by clicking on the appropriate filter button at the top (eg. 'Dividers' will show sections that have full width background images)
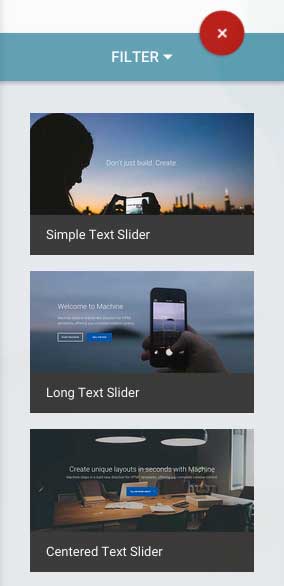 figure 2.1.1 Click a thumbnail to add that section to your layout
2.2 Reordering Sections:
To reorder sections on the page, simply drag and drop the title of the section up or down (see figure 2.2.1) in the layout map in the sidebar.
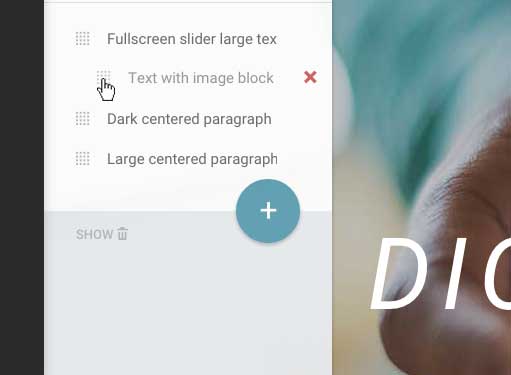 figure 2.2.1 Drag sections up and down to rearrange the order of your layout
2.3 Renaming Sections:
Renaming sections is useful when creating a page that has a 'one page navigation' style. To rename a section, click on its title in the sidebar and change the text (see figure 2.3.1). You will notice that a navigation icon appears when you make this change, this is to signify that this section is now 'linkable' as an inner page navigation option (more on this in section 4.1)
 figure 2.3.1 Click on a section title to rename it - doing this makes it available for in-page navigation in the "Edit Link" panel
2.4 Removing Sections:
To remove a section, hover over its title in the layout map on the sidebar and you will see a red cross icon on the right. Click the icon to remove the section.
3. Editing Content
3.1 Editing Text
Click on any text element on the page and you will see a cursor appear where you can edit the text of the element (see figure 3.1.1). You are free to paste text into any element.
 figure 3.1.1 Click any text on the page to edit the text
3.2 Editing Images
Important Note: Variant looks for your images directly inside the 'img' directory of the template (not the variant/img directory). If you add images that are not contained directly within the 'img' folder, an error will appear over the image prompting you to move the image file to the img folder and click to refresh.
Many elements within Variant templates have editable images. To edit the image, right click on the element and click 'Edit Image' in the context menu (See figure 3.2.1), this will show the 'Edit Image' panel.
From here, you can manually enter an 'src' value (be it local or elsewhere on the web) and also the 'alt' value for the image. (see figure 3.2.2)
To select images from your 'img' directory, click the 'Toggle Chooser' button and select your image.
Click 'Save' when done to commit changes - you will see your image appear immediately.
Please note: Variant does not automatically resize or crop your images, see the image sizes of the supplied imagery as a guide.
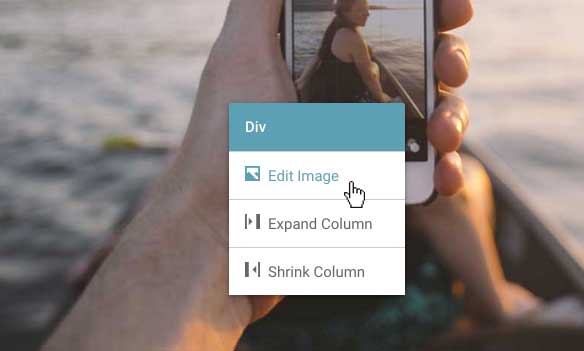 figure 3.2.1 Right click an image to edit the image path
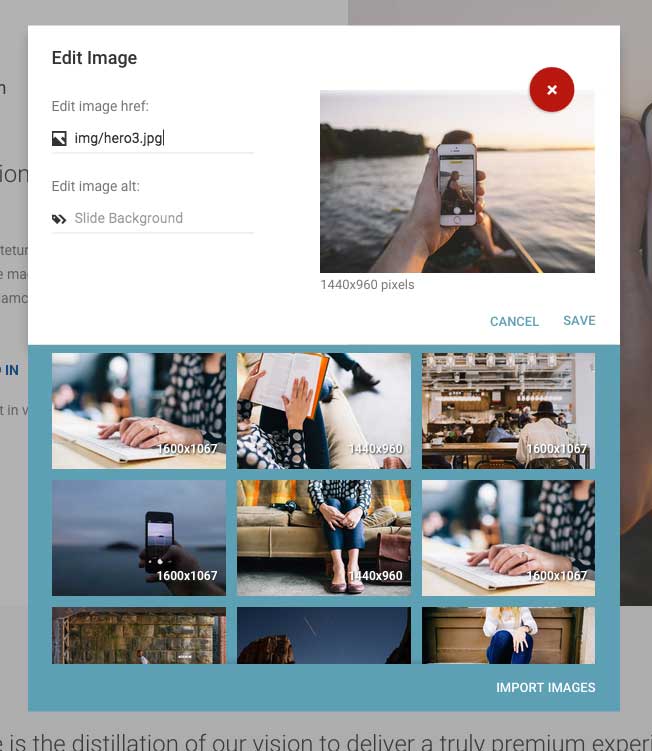 figure 3.2.2 Right click an image to edit the image path
3.3 Editing Icons
To edit an icon, right click on it and select 'Edit Icon' from the context menu (see figure 3.3.1)- the icon chooser panel will appear. From here, select the icon you wish to use and click 'done' (see figure 3.3.2).
![]() figure 3.3.1 Right click an icon to edit the image path
figure 3.3.1 Right click an icon to edit the image path
![]() figure 3.3.2 Right click an icon to edit the image path
figure 3.3.2 Right click an icon to edit the image path
3.4 Editing Links
To edit a link, right click on it and select 'Edit Link' from the context menu (see figure 3.4.1) - the Edit Link panel will appear. From here you can edit the 'href' value of the link and also the 'target' value. Make your changes and click 'save' to commit. (see figure 3.4.2)
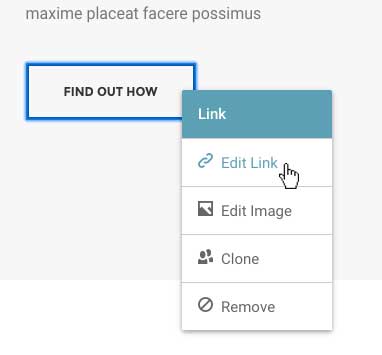 figure 3.4.1 Right click a link to edit the link path
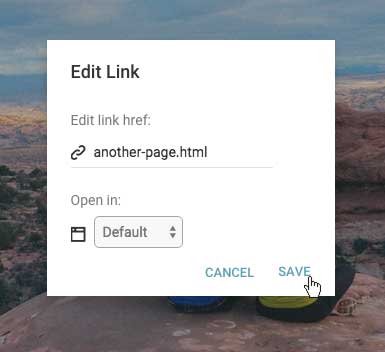 figure 3.4.2 Enter your desired href value and select a target. If you have in-page links (see figure 2.3.1), they will be selectable at the top of this box
3.5 Cloning Content
Variant enables you to clone content by right-clicking on an element and selecting 'Clone' from the context menu (see figure 3.5.1). This will make an exact copy of the element and is especially useful for sections such as 'services' (where you may require more than the section initially shows).
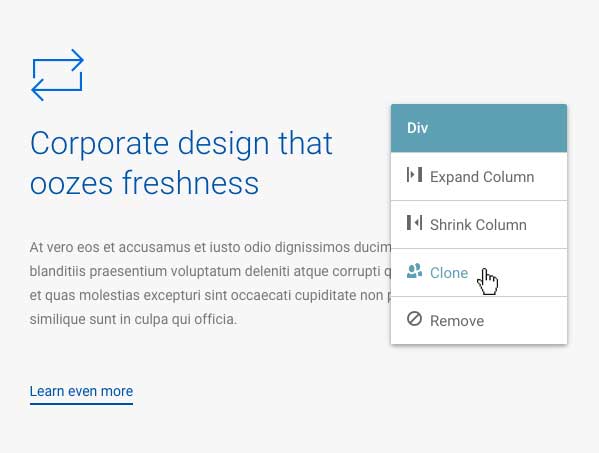 figure 3.5.1 Right click an element to clone it
3.6 Trashing and recovering content
Variant enables you to remove content from the page by right clicking and selecting 'Remove' from the context menu (see figure 3.6.1). This content is always recoverable by clicking the red 'Show Trash' button in the bottom left-hand corner of the layout map (see figure 3.6.2). You will see your trashed content re-appear on the page greyed-out with a red border (see figure 3.6.3). To recover this content, simply click on it - you will notice it now appears on the page as normal.
Be sure to click the trash button again once you're finished recovering removed content to avoid strange positioning. All trashed content will be saved with your page but is removed in the final HTML document.
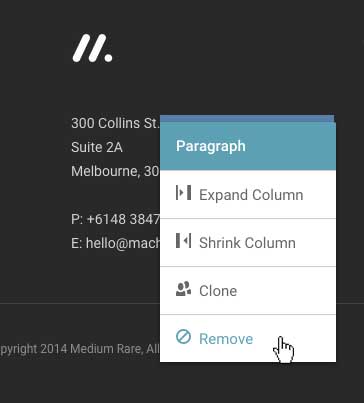 figure 3.6.1 Right click an element to remove it
 figure 3.6.2 Click "Show Trash" button to reveal your deleted items.
 figure 3.6.3 With your trashed items shown, left-click the faded deleted items to un-delete them
3.7 Adjusting Column Widths
Most elements such as services, pricing tables, text, etc. allow you to edit the column-width. This is especially useful if you have a specific number of elements you want that differs from the original layout. To adjust the width of an element, right click it and select either 'Increase Columns Width' or 'Decrease Column Width' from the context menu as appropriate.
Power User Tip: Use the '[' key to decrease column width and the ']' to increase column width
4. Social Features
4.1 Adding an Instagram feed:
Some Variant templates come with an integrated Instagram feed section. To change which feed is displayed, first add the section to your page, then right-click it and select 'Edit Instagram Feed', then type in the desired Instagram username you wish to display.
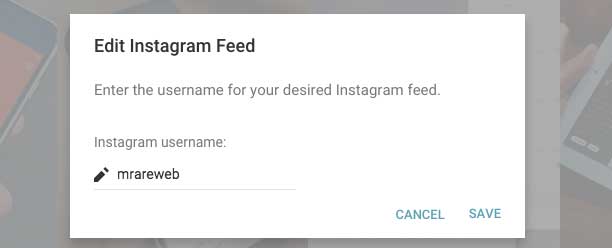 figure 4.1.1 Enter the name of the Instagram user you wish to display and hit 'Save'
4.2 Adding a Twitter feed:
Some Variant templates come with an integrated Twitter feed section. To change which feed is displayed you will need to create a Twitter widget in your settings page on Twitter account.
Do this by going to the 'Settings' page of your Twitter account and clicking 'Widgets'. Click 'Create New' and then 'Create Widget'. One done, go back to the 'Widgets' page and click 'Edit' on your newly created widget. From here you need to copy the widget id out of the url bar. The widget id is the long numerical string after /widgets/ and before /edit and paste it into the 'Widget ID' box of the 'Edit Twitter Feed' modal.
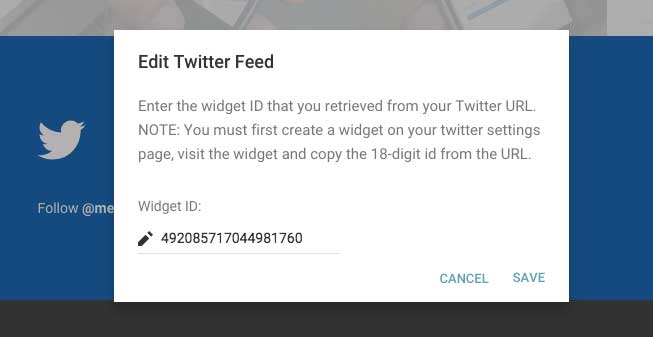 figure 4.2.1 Enter your Twitter widget ID in this box to link the feed to your account
4.3 Linking forms with Mail Chimp
Some Variant templates come with Mail Chimp enabled forms. You will see in the 'Add Sections' panel that some forms have the Mail Chimp and Campaign Monitor logos.
To link a form with Mail Chimp, first add the relevant form to your page, then right-click on it and click 'Embed Mailing List Form'.
- From here you will need to go to your account on the Mail Chimp website and select your relevant list from the 'Lists' tab.
- Once here, click 'Signup Forms' then 'Embedded Forms'
- The relevant form you select the code for will depend on the style of form you have selected. The 'Embed Mailing List Form' widget will instruct you as to which form code you need to copy.
- Copy the form code and paste it into the 'Form Embed Code' field in the 'Embed Mailing List Form' modal and click 'Save'
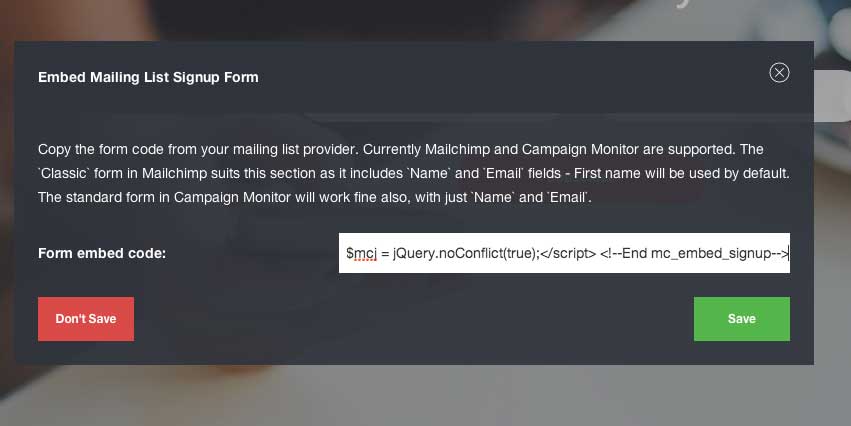 figure 4.3.1 Enter your copied form code from Mail Chimp into this field
4.4 Linking forms with Campaign Monitor
Some Variant templates come with Campaign Monitor enabled forms. You will see in the 'Add Sections' panel that some forms have the Mail Chimp and Campaign Monitor logos.
To link a form with Campaign, first add the relevant form to your page, then right-click on it and click 'Embed Mailing List Form'.
- From here you will need to go to your account on the Campaign Monitor website and select your relevant list from the 'Lists & Subscribers' tab.
- Once here, click 'Grow Your Audience' in the sidebar and click 'Copy/paste a form to your site'
- Click 'Get Code' and copy it to the clipboard
- Paste the form code into the 'Form Embed Code' field in the 'Embed Mailing List Form' modal and click 'Save'
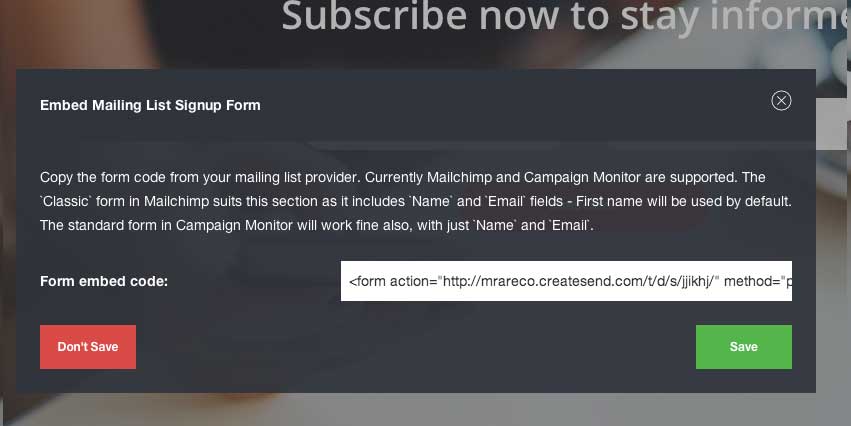 figure 4.4.1 Enter the code you copied from the Campaign Monitor website into this box and hit 'Save'
4. Managing Navigation
5.1 Adding a menu:
To add a menu, select a navigation style from the 'Navigation Style' dropdown in the sidebar.
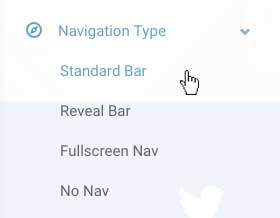 figure 5.1.1 Select a nav style from the list to have that menu added to your page
5.2 Saving a menu:
When you edit the text on any menu item for the first time, you will be prompted to name and save your nav (see figure 5.2.1). Once done, this nav will appear in the 'Navigation Styles' dropdown list in the sidebar, you can then select this nav on any page you create.
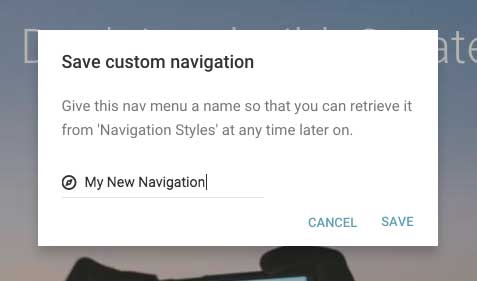 figure 5.2.1 Enter a name for this nav - which will now be available across all your pages and saved if you refresh the page
5.3 Managing links in your menu:
Building your menu is a matter of cloning (or removing, if unnecessary) existing menu items and then changing the details (text and href) to suit. By default, your template will come with all available menu options (such as dropdowns etc).
5.4 In Page Navigation
If you are building a 'one page' site or a page that requires inner links, follow this process to ensure correct 'smooth scroll' navigation function:
- Name your sections appropriately in the layout map on the sidebar (see figure 2.3.1). When you rename a section you will notice a link icon appears beside it - this signifies that this section is now available as an inner link option
- When editing your links in the menu, you will see a select option 'Select an in-page navigation link' (see figure 5.5.1). Choose the appropriate section from the menu and you will notice the 'href' value fills out for you. Click save to commit
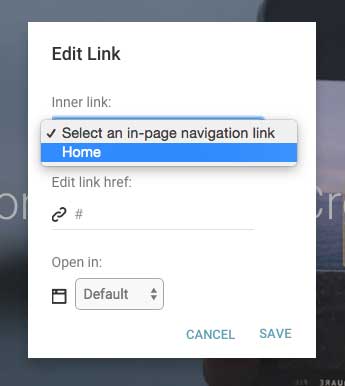 figure 5.5.1 Select your link from this dropdown to have it connected via smooth-scroll to your in-page link
6. Managing Footers
Managing footers works in a similar way to navigation. Add a footer to your page by selecting an option from the 'Footer Styles' dropdown in the sidebar (see figure 5.1.1).
The first time you change text on the footer, you will be prompted to name and save the footer (see figure 5.1.2). Once done - your saved footer will appear in the 'Footer Styles' dropdown. This makes it easy to use the same footer across multiple pages.
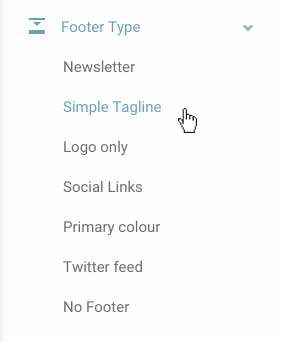 figure 5.1.1 Select a footer style to have it added to the foot of your page
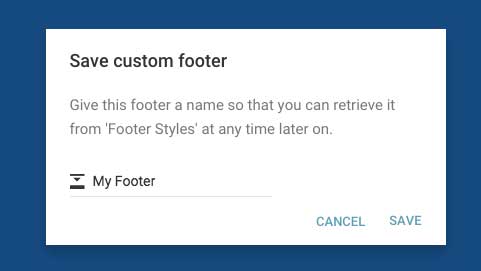 figure 5.1.2 Give your footer a name, then you can use it across any page you make
7. Saving & Loading Pages
7.1 Saving Pages
To save a page for later use, open the options panel by clicking the page icon in the top left corner of the sidebar and click 'Save Page As' (see figure 7.1.1). Name your page and click 'save' (see figure 7.1.2). You will now see your page appear inside the pages tab - return to this page at any time by clicking on the page icon.
Note: All content changes such as text, image, icon, page title, section title etc. are always saved to your current page name.
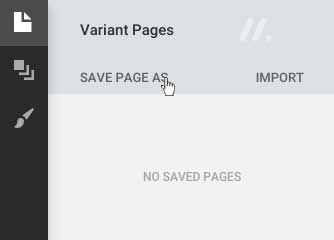 figure 7.1.1 Save your page for later use
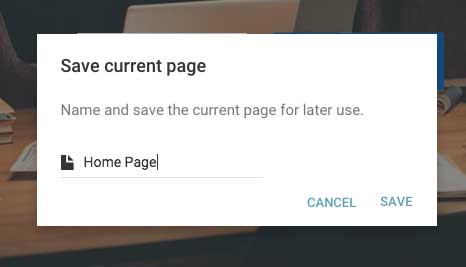 figure 7.1.2 Add a name for your page and click "Save"
7.2 Loading Pages
When loading Variant, you will be prompted to either start a new page or load the previous page (if one exists). Clicking 'Load PAGE-TITLE' will load a previously saved page. To select a different saved page, open the pages tab by clicking on the page icon in the top left corner of the sidebar and select the appropriate page (see figure 7.2.1).
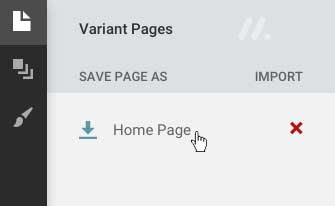 figure 7.2.1 Click your desired page to load it
7.3 Deleting Pages To delete a page, open the options panel, hover on the appropriate page, you will see a cross icon appear in right corner. Click this to remove the page.
8. Getting Output
Getting HTML
Variant builds your HTML on the fly so you can click the 'Get HTML' button at any time to retrieve a complete and functional HTML document (see figure 8.1.1).
Click the 'Get HTML' button at the bottom of the 'Content' or 'Style' tab on the sidebar and the 'Your Code' panel will appear (see figure 8.1.2). From here you can copy your pages HTML.
 figure 8.1.1 Click the 'Get HTML' button to get code for your current page
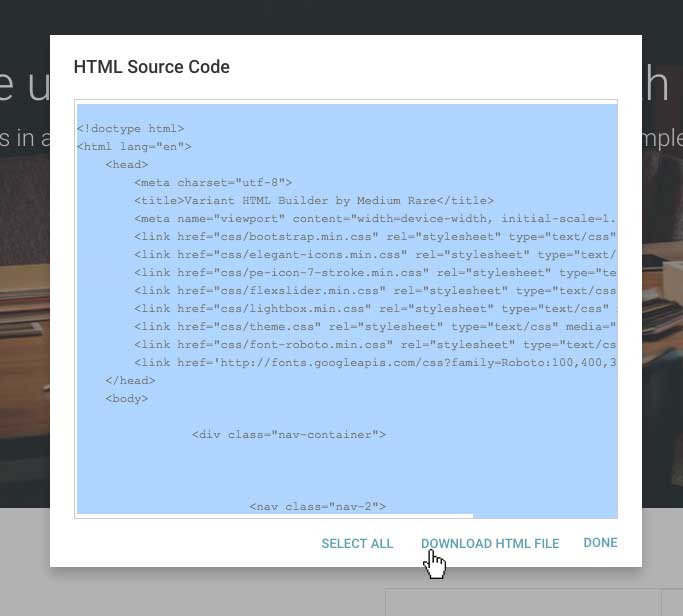 figure 8.1.2 Copy your code to a text editor and save it as an .html file and view it in your web browser
Saving HTML Use a text editor to paste your page's code in and save it as an HTML file (eg. my-new-page.html). Place this file inside the template root directory (NOT the variant directory)
Viewing your page Open your HTML in a web browser to view, voila! :)
9. Exporting / Importing .variant pages
Exporting Pages
As of Variant 2.0, you can now export pages so they can be imported into Variant later and revised / updated. This feature is especially useful if multiple people want to work on the file, someone can export the file as .variant, send to their collaborator, who can then import and modify.
To export a page, first save it (as described in 7.1), then hover on the page's title in the 'Pages' tab. Click the green download icons to export the page. The page should download as a .variant file immediately from your browser. Alternatively you can export all saved pages to a single .variant file by clicking '.variant' button when hovering on the 'Export' button at the bottom of the pages tab.
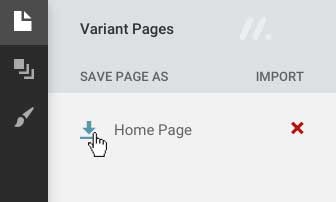 figure 9.1.1 Export a .variant page by clicking on the green download icon
Importing Pages
To import a page, click the 'Import' button on the 'Pages' tab. Browse for your .variant file and click 'Open'. Once imported, a modal will appear with an Import report.
Note: You can not import pages from different Variant templates. For example, you can't make a page in Pangaea and import it into Pivot.
Once the page has imported, simply click its title to load it into the main page area and continue editing.
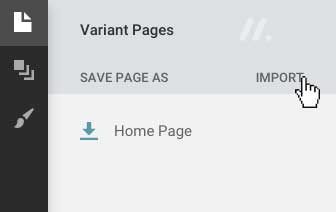 figure 9.1.2 Import a .variant page, then click its title to load it